Preparing Files for Transfer
Selecting Files
The file browsers support extended selection. There are several ways to select multiple items.
- Click on an item to select it.
- Hold Control,⌘ and click individual items to toggle their selection.
- Click one item, hold Shift, and then click on an item above or below to select a range of items.
- Press Control,⌘ + A to select all items.
Adding Items to a Transfer
To add items to a transfer, select, then drag-and-drop onto the destination folder in the target Location’s file browser. The destination folder is highlighted with a dashed outline. You may drag individual files, or entire folders.
While dragging over the destination file browser, hover over folders to open them automatically.
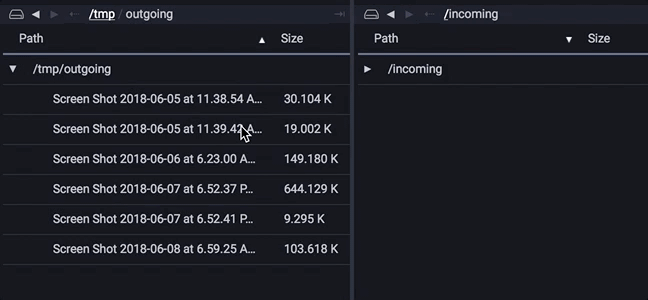
In the above animation, /incoming/screenshots is the destination folder.
Tip
It is also possible to drop files from the desktop or from the system’s file manager application (e.g. Windows Explorer, macOS Finder, GNOME Nautilus). Dropping from the desktop to the Local Location is not permitted.
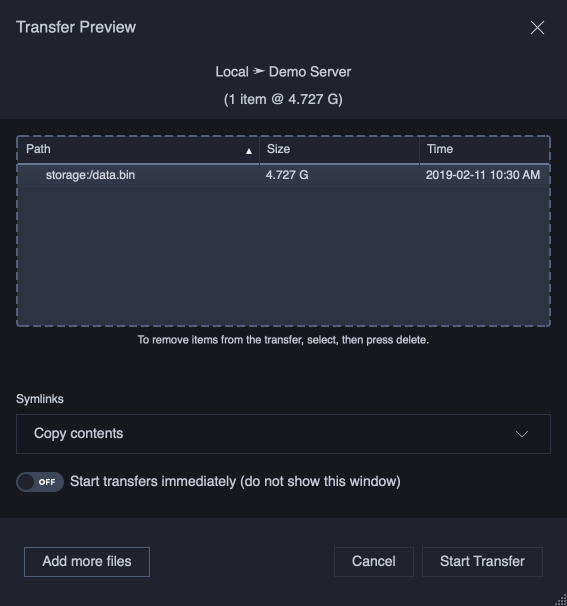
Transfer Preview
After dropping items onto a file browser, the Transfer Preview window appears. At this time, the transfer can be examined, edited, then started by pressing the Start Transfer button.
Tip
It is possible to bypass the preview, and start the transfer right away after items are dropped.
- Enable Start transfers immediately to bypass the transfer preview window. The option can be also be changed in the application settings.
- Press Control,⌘ before dropping items. The transfer will always begin immediately.
You will not be able to assemble a transfer across multiple drag-and-drops if the preview is disabled.
If the preview is disabled, you can temporary override the setting by pressing Shift before dropping items. This forces the Transfer Preview to be shown.
Removing Items
To remove selected items from the transfer:
- Click to select one or more items in the transfer.
- Press the DELETE keyboard shortcut.
The items are deleted.
Tip
Extended selection is supported. There are several ways to select multiple items.
- Click and hold the left mouse button, and drag a range of items.
- Hold Control,⌘ and click individual items to toggle selection.
- Click one item, hold Shift, and then click on an item above or below to select a range of items.
Adding Items
To add additional items to the transfer, click on Add more files. The Transfer Preview window will close and additional files can be selected and dropped. The Transfer Preview window will open again showing the combined list of items to be transfered.
Note
This feature is unavailable if Start transfers immediately on file drop is enabled in the application settings. You can temporary override the setting by pressing Shift before dropping items. This forces the Transfer Preview window to be shown, making Add more files available.
Sorting The Items
Click on any of the header columns to sort items by that value.
Tip
When sorting by Size, inaccessible items will remain grouped. This allows a convenient way to identify and manage items which cannot be copied.
Symbolic Links
The Symbolic Links dropdown provides a transfer-level option for symbolic link handling. Available options are:
- Copy contents – follow the symbolic link, and copy the actual file contents
- Ignore – Ignore (do not copy) any symbolic links
Note
The default setting for symbolic link handling is set in Location Editor. When Start transfers immediately on file drop is enabled in the application settings, the Symbolic Links setting from Location Editor will be used.
Transfer Size Summary
Above the path list, an information line shows a summary of the transfer, showing the number of items and the size that would be created.

If any folder is busy calculating its size, the summary will refrain from showing the overall size of the transfer.

The size will be displayed when the calculation is completed.

Path Tooltips
If the path for an item is too long to display in the width available to the transfer list, you can hover the mouse over the item for a popup tooltip that provides the full path.

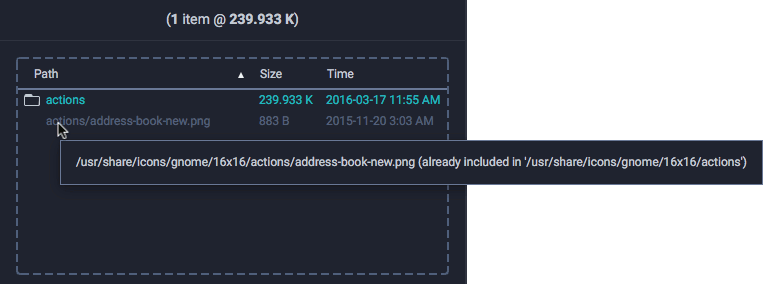
Overlapping Items
If an item is added to the transfer, and subsequently that item’s parent is also added, the transfer will recognize that copying the parent item will also include the child item, and that it is not necessary to copy both individually.
The Transfer Preview will illustrate this by dimming the display of the child item.
In the example below, the file address-book-new.png is added to the transfer.

Next, a parent folder above this file is added. The item list adapts the path optimization, and shows that the child item, while maintained in the list, is vestigial as part of the parent.
Inaccessible Items
Generally, the file browser only shows items for which you have read access. However, for an item to be eligible to be added to a transfer, the application must be able to calculate its size. If an item is not able to provide its size, the item will be shown with a warning icon instead.
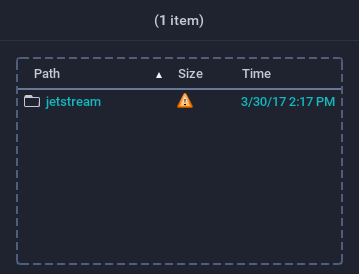
Additionally, a warning message will be displayed in the Status Bar.

Hovering over an item marked with a warning icon will display a tooltip:

While any item shows this warning state it is not possible to start a new transfer. To resolve this issue, you’ll need to modify the permissions for one or more items on the folder (or perhaps the folder itself). Alternatively, you can simply remove the errant item(s) from the transfer to proceed.
Memory
While a connection is maintained to a Location, the Jetstream application will remember any items you’ve added to the transfer for that Location.
Tip
You can freely switch the Location selection without losing any items that have been added to its transfer.
If a Location becomes disconnected the file browser for that Location will be unavailable but the transfer items will be preserved.